Showing posts with label GLW. Show all posts

Tuesday, December 17, 2013

Halloween makeup: Fallen Angel

You are going to need some accessories for this one.


(I apologize for not really having any good pictures of my makeup, I didn't plan on doing this post until later.)

To do the makeup I went with a light foundation, LancĂ´me Color Ideal, and set with MakeUp Forever HD Powder. I lightly contoured underneath my cheekbones with Lorac Baked Matte Satin eyeshadow in Social.

To do the eyes apply black creme eyeliner all over your eyelids and wing the outer edges heavily. Smudge it out with Lorac black matte eyeshadow. Paint some black makeup-smudged tears and set all the black eye color with MUFE HD Powder. Take a clear glitter eyeliner, preferably in aurora borealis hues, and paint over some of the smudged tears. Paint up near your eyes, this is to look as if you are crying angelis  glitter tears.

Highlight the inner corners of your eyes with NYX Jumbo Eyeshadow Pencil in Milk (or any white eyeliner.) apply more glitter here if you'd like.

Get some massive false lashes and paint the tips blood red with acrylic paint (this is optional.) Let it dry completely. Glue on.

I did my brows with a Jordana eyebrow pencil in medium.

Use some pretty innocent pink lipstick, like Revlon Lip butter in Cupcake or Strawberry Shortcake.

Put on your wings, white dress, black fishnet stockings & black OTK motorcycle boots. Wear black Victorian jewelry. Carry as many firearms as possible. ;)


Thursday, December 12, 2013

Look of the Day, Candy Eyes

I wanted to try my new NYX eyeshadow base in White and do something colorful. I used my Urban Decay Deluxe Eyeshadow Palette to create this look:


I applied my Revlon Colorstay foundation (medium beige) with the E.L.F. Studio powder brush, setting it with E.L.F. Studio HD powder in Shimmer.

I coated my eyelids and the highlight on my browbone with the NYX Eyeshadow Base in White, and let it dry. It didn't dry completely... I used my UD Deluxe Eyeshadow palette to do a trio of colors, starting with Honey in the inner corner, Graffiti in the middle and Peace on the outer corner, slightly transitioning them into each other. I did with crease with Half Baked and Smog and blended it slightly upwards with a Lorac baked matte satin eye shadow in Posh. I use that one almost every day to blend my shadows upward, it is just a nearly invisible matte nude color on me.

I lined my lower eyelashes with UD's 24/7 eyeliner pencil in Electric and Graffiti, Electric on the outer corner and Graffiti in the middle to watch the eyeshadow colors, then set them with the corresponding color eyeshadow. I highlighted my inner corner with a NYX Jumbo Eye Pencil in Milk.

I applied Revlon Colorstay Liquid eyeliner, smudging it a little with the E.L.F. Studio Angled Eyeliner Brush. This took away any mistakes or harsh edges and made a warmer, smokier look.

I finished my eyes by applying some "natural" false lashes.

To really make the eyeshadow colors pop, when I was all finished with the eyes I dabbed my finger in each eyeshadow color and pressed it over the top. I've always noticed with Urban Decay eyeshadows you can get a better color payoff this way.

My brows were done with the E.L.F. Studio Eyebrow palette in medium. I exaggerated them, which looked great from several feet away but up close you can see where the brows end and the pretend, drawn on brows start.

With the E.L.F. Studio Flawless Concealer brush, I buffed in an E.L.F. All Over Cover Stick from the essential line in Light Beige and set with Studio HD Powder.

I contoured with E.L.F. Contouring Blush & Bronzer in St. Lucia, and used the Studio HD Blush in Headliner.

I used the E.L.F. All Over Color Stick in Persimmon to slightly highlight the top of my cheekbones.

My wig of choice today is the Gothic Lolita Classic (Wavy) in Light Blonde Mix, which is probably my favorite wig ever. Evarrr.


Verdict on NYX Eyeshadow Base in White:
I am impressed with this base. It worked as a perfect white highlighter, if you use a light hand. My shadows did seem to pop a little more, and they lasted all day with no creasing. I did have trouble getting it to dry, and it kept creasing on my eyelid until I applied my eyeshadow. Then it was set. The NYX Eyeshadow Base in White gets an A+.

Tuesday, December 10, 2013

Makeup of the Day & Black Plum Rhapsody Wig

Today I wanted to try using some temporary eyeliner tattoos I bought awhile ago. I have only tried them one other time and the results were mixed - they are fun but very hard to apply evenly and they always seem to break apart on my eye, ruining the intricate design.

I first washed my face, making sure to remove all the coconut oil from around my eyes. I'll post on that later... :)
I swiped my eyelids with rubbing alcohol, making sure to keep my eyes closed until it dried. Slightly moistening my eyelids with water, I placed the temp tattoos and pressed them down lightly with a wet washcloth, positioning and pressing down the inner corner with a wet cotton swab. The inner corner is easy to mess up and this helps line it right up with your eyelid. Even after this they were still crooked, with one wing sweeping higher than the other. It is extremely hard to get these perfect since you can't see them under the paper when you place them.

I filled in the gaps and right against my eyelids with black liquid eyeliner, drawing one side up higher to make them more uniform. I then did a smoky eye to hide the unevenness even more and used a very light hand on the rest of my face with a nude lip. I added big dramatic lashes and topped the look off with a Rhapsody wig in Black Plum from Gothic Lolita Wigs.


Here is a look at the tattoos up close. As you can see they look better from far away. As Raymond Chandler once said, “From 30 feet away she looked like a lot of class. From 10 feet away she looked like something made up to be seen from 30 feet away.” 


The weird thing is my boyfriend kept saying how pretty I looked, and how he loved my makeup. Yes, I was baffled because he was clearly much less than 10 feet away.

I would probably avoid these eyeliner tattoos because they really don't look all that good from up close. They have a plastic look to them that extends around the edges, and makeup doesn't adhere to that part well. They are extremely hard to position properly, and often for no particular reason, like if you blink or move your eyes, you will get a break or tear in the tattoo. Also the designs with color don't show up well. This tattoo has tiny colored stars on it and they look muddy since there is no way to put white makeup under them. On the other hand, they are very cheap. Like $5 for 40 pairs of them. So that is a good reason to get them, something fun to play around with for little $$$.

Friday, December 6, 2013

Look of the Day: Red hair, green eyes

Let me start off by saying I am not a redhead and I don't have a warm skin tone. But thanks to an order from Gothic Lolita Wigs (Farrah Summer Ed. Showstopper, in case you are wondering) I can be a redhead for one day, minus the right skin tone. Also people have told me I look good in green, which looks good with red, no? So I figure that gives me the liberty to do whatever I want. 

I am able to justify anything. ;)


The eerie thing is I looked at yesterday's picture and I had EXACTLY the same pose and facial expression! So even though I feel I look a bit silly in this picture I'm posting it, because you can actually kind of see my eye makeup. 


I've never had hair this color but I kind of like it. I'm not sure if it likes my skin tone though as I am cool.

So here goes: Green eye makeup. Does that scare you? The memory of blue eyeshadow from the 80's has always made me a little weary of bold, dramatic eyeshadows, but I also LOVE surrounding myself with bright & pretty things, they make me happy. As we all know, when you do a bright or dramatic eye thou shalt not wear a bold lip. Bla bla bla... I kind of follow that. But I'm also of the opinion that you should have fun in any aspect of your life, and if makeup is one of those things, do what you want. If people don't like you for it then they have some real First World Problems.


Here's everything I used today, shown here in ridiculously bad lighting:


No fancy lighting or studio, I threw everything on my bed and used my iPad camera. I'm not proud.


I used my E.L.F. Studio brush set, as well as one Essential brush and a few of my cutie pie pinky brushes. (Did I mention I got those on amazon, $10.83 for 22 brushes?)...But do they work well, you might ask. "They have friggin' pink tips, who cares if they work well???" But yes, they work nicely with some limitations.


The rest of the stuff:


  • E.L.F. Studio Mineral Infused Face Primer
  • MAC Fix+ Sprayed on ELF Studio powder brush to blend & seal foundation.
  • Revlon Colorstay foundation for combo/oily skin, mixed with Lancome Color Ideal Foundation, applied with ELF Studio powder brush.
  • E.L.F. Studio Under Eye Concealer & Highlighter in Light/Glow, concealer only applied underneath eyes.
  • E.L.F. Studio HD Powder to set makeup, applied with Too Faced powder brush. 
  • E.L.F. Studio Cool Bronzer, used for contouring & sculpting.
  • E.L.F. Studio Blush in Pink Passion. I should have used a coral or peach shade but I didn't know which wig I wanted to wear when I put my makeup on. :)
  • E.L.F. Studio Shimmer Palette, applied pink color to top of cheekbones as a highlight.
  • E.L.F. Studio Eye Primer and Liner Sealer, primer only.
  • E.L.F. Studio 141 Piece Master Makeup Collection, black palette, used for the eyeshadows and the green concealer around my nose redness. It kind of wore off quickly. I'm waiting on my green corrective concealer...
  • Italia Eyeliners in Avocado and White.
  • Revlon Colorstay creme gel eyeliner in black, applied with a flat eyeliner brush and winged out, Lightly smoked into bottom lashes.
  • Wet n Wild H2O Proof liquid eyeliner in brown, used to fill in and define eyebrows. I love using this but I wish I had a lighter color as it is a little too dark for me. Painted on, lightly blended and smudged out with small angled brush.
  • Lancome Super-Enhancing Mascara Base. Wow, that stuff works!
  • Urban Decay Skyscraper multi-benefit mascara.
  • Andrea Lash Accents, 318 Black. LOVE these for natural-but-better eyelashes!
  • Darkness eyelash adhesive in clear.
  • E.L.F. Essential Lipstick in Captivating.

Thursday, December 5, 2013

Look of the Day: "Naked" Brigitte Bardot

I wanted to try out some of the new E.L.F. cosmetics I bought during their 50% off Cyber Monday sale. I did an everyday neutral look, topped off with a wig from Gothic Lolita Wigs, the Farrah Summer Edition in color Femme Fatale. Here is the finished look: 


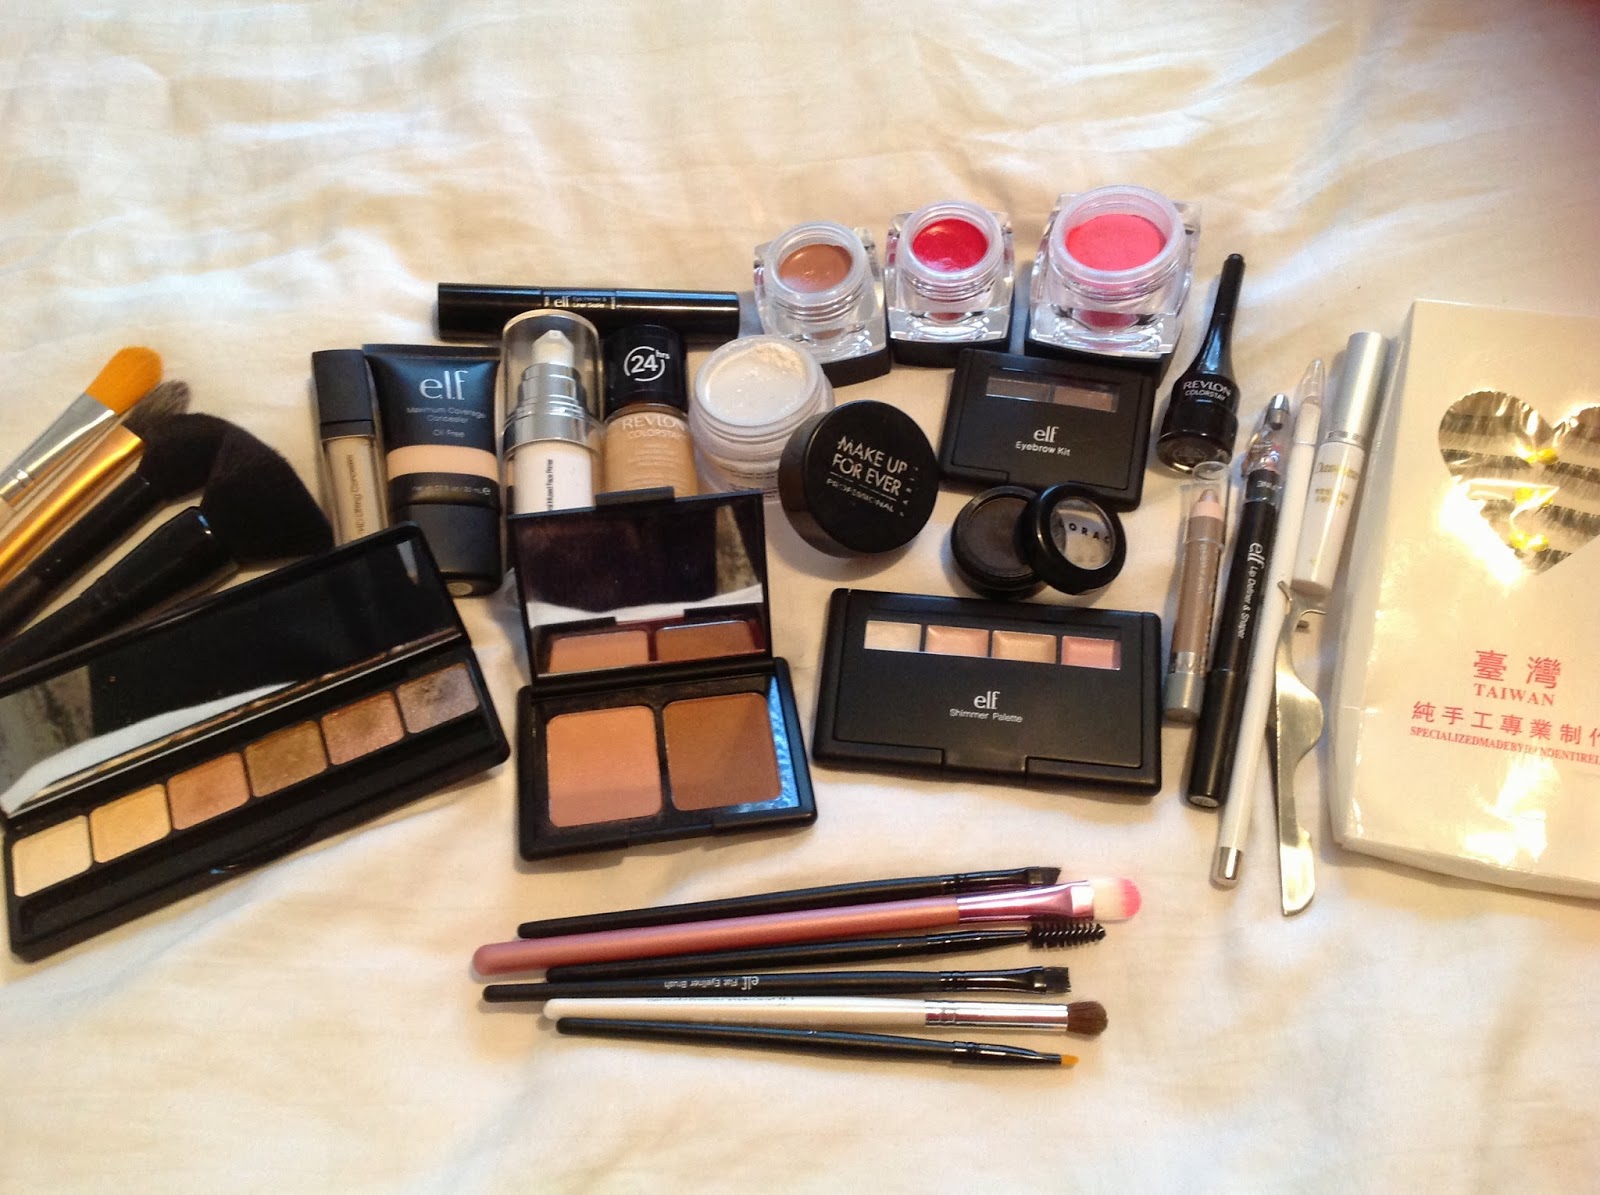
These are the brushes and makeup I used:


E.L.F. Studio brushes & Essential brushes, Real Techniques Pointed foundation brush, some pink eyeshadow brushes I got on Amazon (LOVE these for the price I paid!) Yes I used so many different things today but I was dying to try this new stuff out.

Just beware, this is mostly ELF makeup. My new obsession.


  • E.L.F. Studio Mineral Infused Face Primer
  • Revlon Colorstay foundation for combo/oily skin, applied with Real Techniques pointed foundation brush.
  • Make Up Forever HD Powder to set makeup, lightly applied and pressed in with ELF Studio powder brush.
  • E.L.F. Studio Eye Primer and Liner Sealer, primer only.
  • Wet n Wild Idol Eyes creme stick in Pixie, applied as eyeshadow base
  • Jordana 7" eyeliner pencil in white, highlighting brow bone and inner corners of eyes.
  • E.L.F. Studio Prism eyeshadow in Naked, highlighting inner corners, as a base (on top of WnW Pixie since that was too creamy for me and most likely would have creased.) And in the crease.
  • Revlon Colorstay creme gel eyeliner in black, applied with a flat eyeliner brush and winged out, Lightly smoked into bottom lashes.
  • False lashes from Amazon, they come from Taiwan but I have no idea what company makes these. They are about $3 for 10 pairs, and I adhere them with Darkness eyelash adhesive in clear. I use that strange metal tool to place them and clamp them onto my lashes right against my lash line. It works so well.
  • Urban Decay Skyscraper multi-benefit mascara, applied to blend my lashes into falsies and on the bottom lashes. I forgot to put it in the lineup, sorry.
  • E.L.F. Studio Maximun Coverage Concealer - Oil Free in Porcelain, applied to blemishes only.
  • E.L.F. Studio HD Lifting Concealer in Brightening, applied underneath eyes.
  • E.L.F. Studio Creme Blush in Flirt applied with a stipple brush, which I forgot to put in the lineup.
  • E.L.F. Studio Contouring Blush & Bronzing Powder in Turks & Caicos, used for contouring & sculpting. 
  • E.L.F. Studio Shimmer Palette, applied lightest color to top of cheekbones as a highlight.
  • E.L.F. Studio Eyebrow Kit in Medium
  • E.L.F. Essential Wet Gloss Lash & Brow Clear Mascara, used to tame eyebrows and set the color.
  • E.L.F. Studio Lip Definer and Shaper, used to line lips and highlight cupid's bow.
  • E.L.F. Studio Conditioning Lip Balm in Nice & Natural applied to lips, bottom lip highlighted with Romantic Rouge in the center. It gives your nude lips a more alive look. :)