Now that you have a good brush set you might be wondering what to use each one for. I'll show what I use each of mine for, which usually includes something nonconventional and several brushes have many uses.
Foundation brushes
The first brush is my preferred brush, the E.L.F Studio Powder Brush. I pour a little foundation on my hand, dip the brush lightly into it and either stipple it on or buff it on in a small circular motion. Be sure and only do one area at a time or your foundation might dry before you work it in and look cakey. The buffing technique with this ELF brush really gives me a nice, even coverage and uses less product then stippling and it takes much less time so buffing is my preferred method.
The next one over is the E.L.F. Studio stipple brush. These are used to stipple the foundation on (patting/pushing the product into your skin repeatedly until the foundation is blended.) This particular brush is not dense enough for me and the white bristles are too long so it takes a LOT of time and work to get your foundation on. Stippling your foundation on can help minimize the appearance of pores and create a flawless, airbrushed look.
The 3rd brush from the right is a MAC brush I believe, I bought it to buff in cream foundation from a compact. It works well. The far right brush is also a buffing brush.
The middle brushes (and the 2nd from the right) are used for painting foundation on your face. Use a downward motion to go with the direction of the tiny hairs on your skin.
Mineral Foundation Brushes
These are all used to buff mineral foundation into your skin, using small circular motions starting at the inner part of your face and working out. Dip the brush in a small amount of product, tap it off, and gradually layer if you need more coverage. If you apply too much at once your makeup will look thick and cakey.
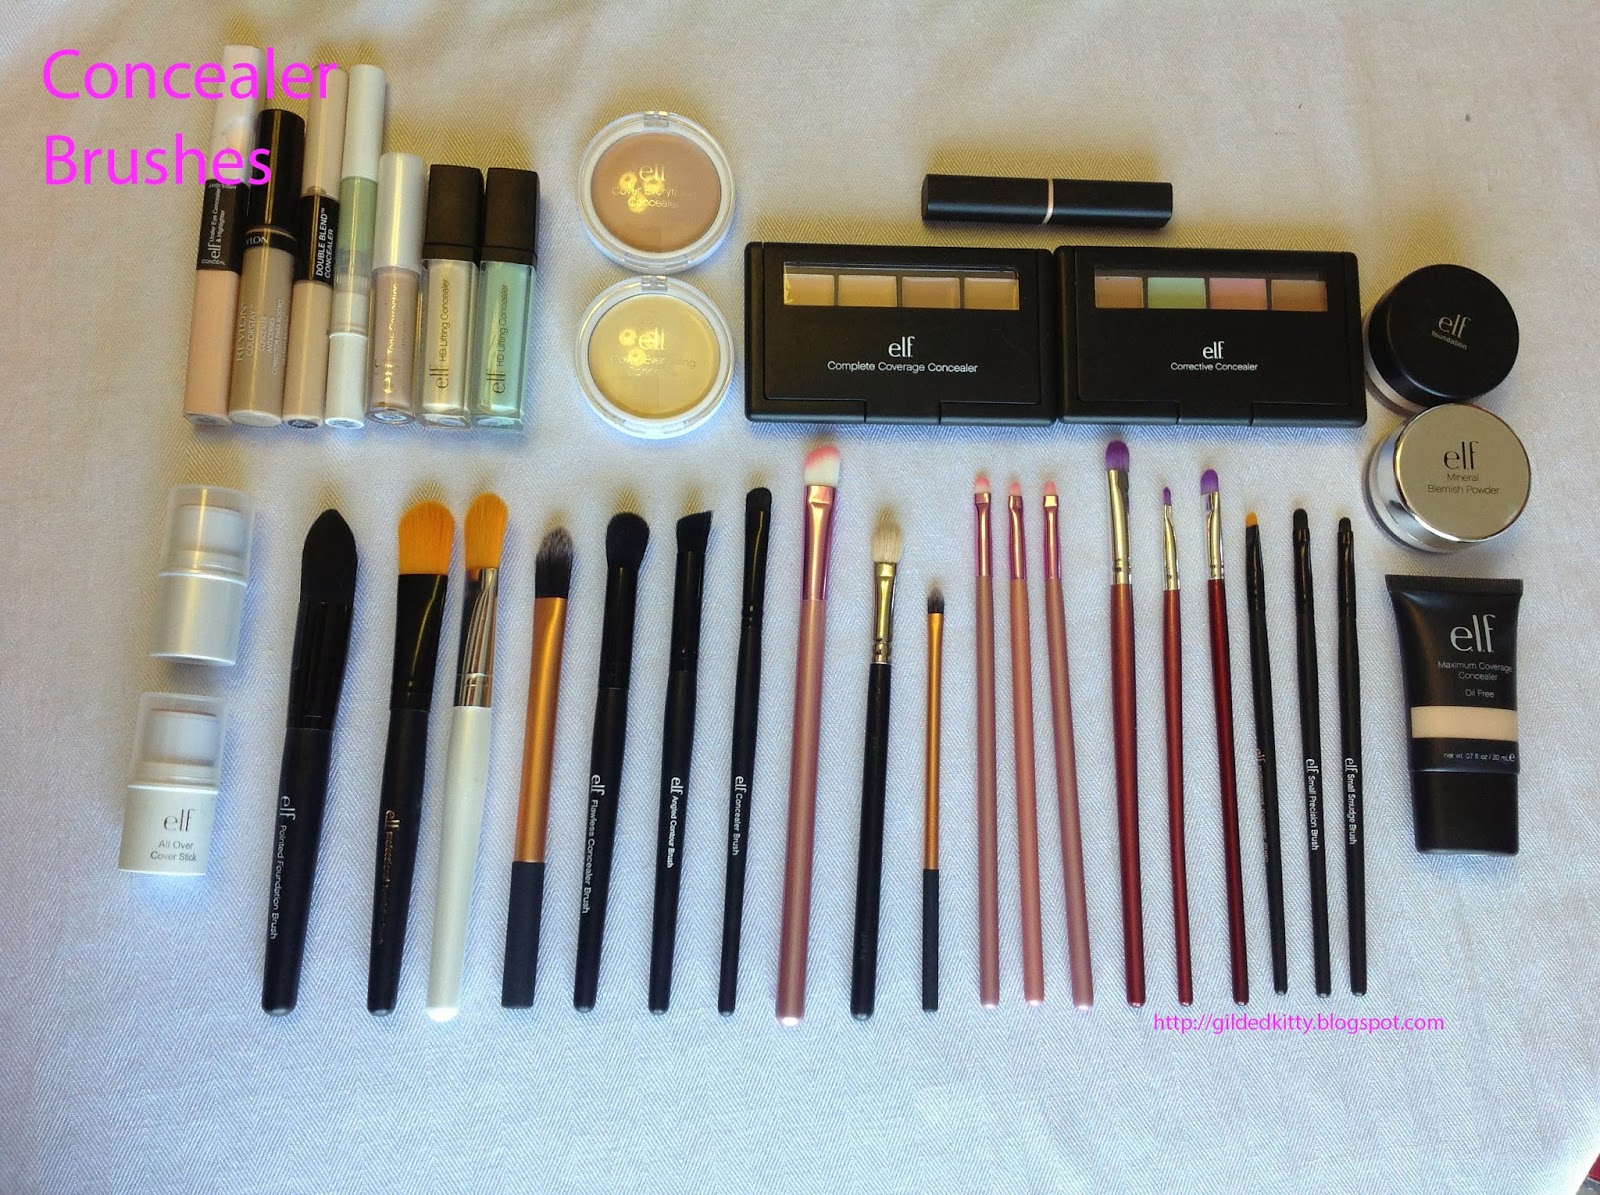
Concealer Brushes
The first 4 are foundation brushes. These can be used for concealing a larger area such as under your eyes.
The 5th and 6th brushes are the ones I prefer for under my eyes, my favorite being the E.L.F. Studio Flawless Concealer Brush. The E.L.F. Studio Angled Contour Brush is also a good one to use for under your eyes.
The rest are various sizes of concealer brushes, stiff eyeshadow brushes and detail brushes that can all be used for concealer, depending on the area to be covered and the amount of coverage you need.
Powder Brushes
I still like to use my Tony & Tina powder brush for applying a light dusting of powder. If I need a heavier coverage I use a powder puff and press the powder in, it helps make your face look more flawless but perhaps a little heavier on makeup because it becomes matte. If I have blemishes to conceal I press the powder over them because the powder brush tends to sweep the concealer away. The E.L.F. powder brush works great for powder (surprise surprise!) but I like to reserve it for my foundation and then use the same brush with the leftover foundation in it to blend out my contours and blush a little if they need to be softened.
Contouring, Blush and Bronzer Brushes
My preferred contouring brushes are the E.L.F. Studio Small Tapered Brush, the E.L.F. Studio Blush brush and the Real Techniques Contour Brush. I like my contour brushes to have a soft, tapered point so I can really get under my cheekbones. The E.L.F. Studio Angled Blush Brush and the E.L.F. Studio Mineral Foundation Brush also work well for contouring. The Real Techniques Buffing Brush is wonderful for bronzing & contouring or applying blush.
My favorite blush brushes are The E.L.F. Studio Angled Blush Brush, Blush Brush, Small Tapered Brush, Mineral Powder Brush, or either of the Stipple brushes, and the Real Techniques Buffing brush. I prefer the stipple brushes for using cream products, contour or blush as you can get a small amount and build up the color. The E.L.F. Studio Small Stipple Brush fits perfectly into their Studio Cream blushes and picks up a tiny amount of product so you don't end up with too much color at once.
You might have noticed I haven't mentioned any of the Amazon pink or purple brushes yet. While they are a good value, the face brushes are very slippery and do not pick up product very well. You can use them in a pinch and they work just fine but they are not my preferred tools. The fan brushes can be used to contour your cheekbones or add a light flush of color to your cheeks. You can also use them to blend out your eyeshadow if you don't have something better. ;)
You might notice the two tubes of concealer on the left side of the picture. You can use a darker color than your complexion to contour, for this I just blend it with my fingers.
Eyeshadow Brushes
Depending on the look I am going for, I use one of the stiff, flat brushes (this is where the pink and purple brushes come in handy) or a softer, fluffier eyeshadow brush. As a general rule of thumb, I use the fluffier brushes for applying a more sheer layer of color and the flat stiff ones when I really want to pack on a color. The small ones, such as detail or concealer brushes, are perfect for highlighting the inner corners of eyes or applying a precise color, such as accenting bottom lash line with a bright shadow. The fluffy brushes are the best for applying highlight to the brow bone, unless you are making a thin highlight right under your brow, then the small brushes are what you need.
Eyeshadow Crease brushes
I prefer the same stiff flat brushes for doing my crease (the pink and purple Amazon brushes) and the E.L.F Essential or Studio Eyeshadow "C" brush. I like to draw a precise line and blend it out with the fluffier brushes. Those brushes work excellent for drawing a cut crease or a defined "C" or "V" crease. Since they are smaller it is easier to layer colors to deepen the crease. The four on the right are what I use to blend out the crease and blend all shadow. I also use one of the foundation brushes, the E.L.F. Essential foundation brush, to really blend my crease up and out, especially if I'm doing any sort of smoky eye. (Unfortunately I forgot to include it in the picture.) Use an upward sweeping motion, it works perfectly! I also use the foundation brush to sweep away any fallout under my eyes, it works so much better for me than a fan brush. In a pinch any of the fan brushes work alright to blend your eyeshadow if you don't have a blending brush.
Eyeliner Brushes

Use any eyeliner brush, a small pointed paintbrush, a concealer or detail brush, a small angled brush or a flat brush to apply gel, cream or eyeshadow to line your eyes. I usually use one of the E.L.F. Essential Concealer brushes or the Small Precision brush. The small angled brushes or the flat liner brushes can make cat eyes quick and easy, you just angle the edge so it follows the curve of your eye and sweep upwards toward your temple. The flat square-looking eyeliner brushes are called push eyeliner brushes, they are meant to be used to push product (cream, gel or powdered shadow) into your lash line to create darker-looking lashes without a heavy eyeliner look. The four on the right are for smudging your eyeliner or applying a powder over your eyeliner, I usually apply a matte black shadow or a color that corresponds to the eyeliner used to smudge and smoke out the line. Alternatively you can smudge some brown matte shadow over black liner to soften the harsh look of the black.
Eyebrow Brushes
Without a doubt the best eyebrow brush would be a small angled brush. You can try others but they will probably not work as well. The pink brush with a comb/brush is to comb your eyebrows up or comb through your lashes to separate mascara clumps. The spoolie is also used for the same things. Tweezers are for plucking, in case you are completely new to this grooming thing.
Lip Brushes
All of these brushes work well for applying lip product. The key is you want some sort of tapered or rounded bristles, as a square brush would make it hard to draw curved lines on your lip. I usually just use one of the retractable brushes because I don't want to have to wash all the greasy lipstick out of another brush and risk introducing oil into something that I don't want it in. Plus they are so handy, the E.L.F. Studio Retractable Lip Brush or the Lancome Retractable Lip Brush are handy to throw in a purse. As a side note, the E.L.F Studio HD blush doubles as a very pigmented lipstick!
Miscellaneous Tools
These are a few of the other tools I keep in my makeup belt.
- The first one is an eyelash curler, use this before putting on mascara or to curl false lashes if you'd like (after they are adhered!)
- The next one is actually a nail tool, it is for pushing back cuticles but I use it to scoop or scrape off small amounts of product. For example I'll scoop out a little eyeshadow pigment to mix with a medium to make eyeliner, or I'll scrap off some pan concealer to mix two colors. The flat side works well for shaving off some pressed eyeshadow, as it has a tapered edge.
- This is simply a spreader, like for putting butter or jam on bread. I use it to scoop out product, such as coconut oil or lotion to keep the container as sterile as possible. It comes in handy when I'm filling a container, such as adding some product to a smaller jar for a travel size or getting the last of something out of the bottom of a jar. I just wash it with soap and water when I'm done.
- This is the E.L.F. Studio mascara and shadow shield. I believe this is for putting under your eyelashes to prevent mascara from getting on your skin, or to hold under your eyes while applying shadow to catch fallout. You could also use it as a guide for winged eyeliner or a guide to creating a winged crease with your eyeshadow. I've never actually gotten around to using this as I just sweep away fallout with a flat foundation brush or if it's really bad I swipe a cotton swab dipped in coconut oil under my eyes, blot the oil off with a tissue, and apply new concealer under my eyes and set it with powder. E.L.F. also puts out a really useful makeup remover pen that works very well and it's only $3.
- This is my favorite gadget ever, it's a false eyelash applicator. You hold the lashes in a curved shape, apply a thin line of glue and let it sit until it is tacky, about 30-60 seconds. Hold the lashes straight up so the tips are pointing to your eyebrows and gently place them on your lash line, this is so they don't get stuck on your real eyelashes. slide them in place if they are too far to one side, using one of the points to grab the lashes near the edge. Pick up the ends and place them right against your lash line if they didn't land there. Now use the tool like a clamp and squeeze the false lashes into your own, this helps them adhere and puts them right against the lash line. This thing is a Can't Live Without for me. Alternatively you can use a tweezer, which is what I did before I found this tool.
- The last one is a tweezer, for plucking, picking up, placing, etc. There is always a use for tweezers in a beauty bag.