Friday, December 13, 2013

How do you clean makeup brushes?

I used to heavily neglect my makeup brushes but that's all in the past. I dutifully clean the eyeshadow brushes and eyeliner brushes every day and the face brushes at least once a week. (If I use a flat foundation brush I clean that each time.)

I made my own brush cleaner using roughly 1/3 olive oil and 2/3 dish soap or baby shampoo. I am not a measuring-type person so I just guess the amounts.


Pour them in and if someone is taking pictures you will probably spill something.


I should Photoshop that out.


Mix them up, they will emulsify and become creamy. That part is my favorite. Gotta love science.

Now on to the cleaning part.
When I wash my brushes I use cold water so I don't melt the glue. My secret to squeaky-clean brushes is one of these brush cleaners from the craft store, it's called the Brush Preserver Kit from Folk Art. It's really best for synthetic fiber brushes but you can use your own judgement, I use some of my smaller animal hair brushes on the brush cleaner & it hasn't ruined them at all. It really gets in between the bristles and gets all the makeup out. This is important because I have those cute white bristle brushes with pink tips and I don't want them to look dirty! And it also helps keep bacteria at bay. Drag the brushes though it only one way, tilting the brush almost horizontal and pull from the handle so the bristles drag behind. You don't want to destroy your brush by going crazy here.


Try not to tip the brushes upside down so water will stay out of the ferrel. I gently squeeze the brushes in a super-absorbent hair towel, reshape them and lay them out, folding the towel at one end so the brush head tilts downward.


That's it! Super clean brushes. If you use natural hair brushes you can rub some olive oil in the bristles, let them soak for 5 minutes and repeat the cleaning process. No need to do this with taklon/synthetic brushes unless they are in bad shape and you are trying to revive them.

Look of the Day: smoky nude

One of my favorite challenges is doing a sultry, sexy look while also looking like you aren't wearing much makeup. For this I like to do a nude smoky eye. As a random side note, this 'Look of the Day' had absolutely nothing to do with the jerkface redneck random Walmart customer that I overheard commenting to his much nicer buddy, who had just complimented how I looked, "yeah but did you see much sh..(blaaank) she had on her face?" Just yesterday...Nothing to do with that. Yes, I had FOUR different bright colors on my eyelids but does that give him the right to have an opinion? Absolutely Not!! Not if it is clearly a WRONG opinion. I wanted to pull a Walter White on his @ss but I was a good, civilized person about it and I just slashed his tires while he was shopping.

Sooo anyway.....here's the look.


I started off with Maybelline Color Tattoo eyeshadow in Tough as Taupe. I blended it up and out before it dried. I then used a brownish gray shade from the E.L.F. Studio 144-Piece Ultimate Eyeshadow Palette in Neutral over the taupe, and brightened the inner corners of my eyes and up into the inner 1/4 of my eye with NYX Jumbo Eye Pencil in Milk. I blended it out with a small Real Techniques detail brush.

I took a pink stiff brush and added a deep crease with a darker gray shadow from the E.L.F. palette. I smudged it out with a Real Techniques crease blending brush and added more eyeshadow with the detail brush inside the smudged shadow to intensify the crease. I selected a darker gray--almost black--and further deepened the outer part of the crease and brought it down across my lash line, focusing on the outer ends. I also shaded the inner half of my lower lash line.

I decided to kick it up a notch and picked up a little E.L.F. Studio Cream Eyeliner in black and smudged it across the lash line, trying to keep it as close to my lashes as possible. I again focused on the outer edges and blended it so it gradually ended about 2/3 of the way in. I brought it out slightly into a subtle wing. I added a touch to the lower lashes. The idea was to keep it as natural looking as possible, as if my lashes were just really, really thick. ;) I didn't wear falsies out of sheer laziness but I coated my lashes in Urban Decay Skyscraper Mascara. I did my brows with the E.L.F. Studio Eyebrow Kit in Medium.

I finished off with a light contour under my cheekbones using The Balm bronzer in Betty Lou-Manizer and added a flush to my cheeks with The Balm blush in Hot Mama! (Yes, the exclamation point is part of the name.) The Betty Lou-Manizer is actually meant to be an all-over color or a highlight aka FAKE TAN but it was all that was nearby and that made the decision for me.


Eat your heart out, Walmart Customers.


Thursday, December 12, 2013

Look of the Day, Candy Eyes

I wanted to try my new NYX eyeshadow base in White and do something colorful. I used my Urban Decay Deluxe Eyeshadow Palette to create this look:


I applied my Revlon Colorstay foundation (medium beige) with the E.L.F. Studio powder brush, setting it with E.L.F. Studio HD powder in Shimmer.

I coated my eyelids and the highlight on my browbone with the NYX Eyeshadow Base in White, and let it dry. It didn't dry completely... I used my UD Deluxe Eyeshadow palette to do a trio of colors, starting with Honey in the inner corner, Graffiti in the middle and Peace on the outer corner, slightly transitioning them into each other. I did with crease with Half Baked and Smog and blended it slightly upwards with a Lorac baked matte satin eye shadow in Posh. I use that one almost every day to blend my shadows upward, it is just a nearly invisible matte nude color on me.

I lined my lower eyelashes with UD's 24/7 eyeliner pencil in Electric and Graffiti, Electric on the outer corner and Graffiti in the middle to watch the eyeshadow colors, then set them with the corresponding color eyeshadow. I highlighted my inner corner with a NYX Jumbo Eye Pencil in Milk.

I applied Revlon Colorstay Liquid eyeliner, smudging it a little with the E.L.F. Studio Angled Eyeliner Brush. This took away any mistakes or harsh edges and made a warmer, smokier look.

I finished my eyes by applying some "natural" false lashes.

To really make the eyeshadow colors pop, when I was all finished with the eyes I dabbed my finger in each eyeshadow color and pressed it over the top. I've always noticed with Urban Decay eyeshadows you can get a better color payoff this way.

My brows were done with the E.L.F. Studio Eyebrow palette in medium. I exaggerated them, which looked great from several feet away but up close you can see where the brows end and the pretend, drawn on brows start.

With the E.L.F. Studio Flawless Concealer brush, I buffed in an E.L.F. All Over Cover Stick from the essential line in Light Beige and set with Studio HD Powder.

I contoured with E.L.F. Contouring Blush & Bronzer in St. Lucia, and used the Studio HD Blush in Headliner.

I used the E.L.F. All Over Color Stick in Persimmon to slightly highlight the top of my cheekbones.

My wig of choice today is the Gothic Lolita Classic (Wavy) in Light Blonde Mix, which is probably my favorite wig ever. Evarrr.


Verdict on NYX Eyeshadow Base in White:
I am impressed with this base. It worked as a perfect white highlighter, if you use a light hand. My shadows did seem to pop a little more, and they lasted all day with no creasing. I did have trouble getting it to dry, and it kept creasing on my eyelid until I applied my eyeshadow. Then it was set. The NYX Eyeshadow Base in White gets an A+.

Wednesday, December 11, 2013

Which Black Liquid Eyeliner is the best?

This is a test I've wanted to do for a long time. I ended up with 13 different kinds of black liquid/gel/creme eyeliner and I'll do a quick demonstration so you can make a decision on which one is right for you.

Here are the contenders:


The first set of 3 is from the Revlon ColorStay collection.

  1. Liquid Eyeliner in Blackest Black, $7.29
  2. Liquid Eye Pen in Blackest Black, $6.79
  3. Liner Creme Gel Eyeliner in Black, $9.99
The next set of 4 is from E.L.F. Cosmetics.
  1. Studio Precision Liquid Eyeliner in Black, $3
  2. Essential liquid Eyeliner in Black, $1
  3. Studio Cream Eyeliner in Midnight. (I mistakenly thought I picked up black.) $3
  4. Studio Cream Eyeliner in Black, $3
The last one on the top row is from Wet n Wild.
  1. H2O Proof Liquid Eyeliner in Ultra Black, $3.99
The first set on the second row is Jordana.
  1. 12 Hr Made to Last Liquid Eyeliner Pencil in 01 Black Point, $2.99
  2. 12 Hr Made to Eyeshadow Pencil in 02 Stay On Black, $3.99
  3. Bold Felt Tip Liquid Eyeliner in 01 Black, $2.99
The last 2 are some random ones I had in my makeup bag, the Clinique Brush-on Cream Liner in True Black, $16.00, is very old, like almost 7 years old. I haven't thrown it away because I feel the color intensified over time and I currently didn't have anything to replace it. I spray it with rubbing alcohol when I do use it. The last one is Lorac On Screen Duo in Fame & Fortune, $14.25 - $21.99 (current price via Google Search.)

I painted them on my hand in the same order:

 Indoor Lighting
Outdoor Lighting

Next I did a water test. I doused my hand in cold water. None of the eyeliners ran. 


I then rubbed the top row up and the bottom row down.


As you can see the two Revlon Colorstay liquid liners ran but the gel stayed put. All of the E.L.F. liners stayed put. The Jordana liners survived except the felt tip pen liner. The Clinique cream liner stayed. The Lorac liner started failing miserably right from the beginning.

The final test I submerged my hand in hot water for about 10 seconds and wiped each row several times, the top row up and the bottom row down. Everything started to smear except the E.L.F. Studio Precision Liquid Eyeliner in Black and the Wet n Wild H2O Proof Liquid Eyeliner in Ultra Black. I rubbed the top row several more times to distinguish between the two last surviving liners. Then the E.L.F. Studio liner started flaking off. The answer was pretty clear:


Verdict:

The winner for Blackest Black is a tie between E.L.F. Studio Precision Liquid Eyeliner in Black and Wet n Wild H2O Proof Liquid Eyeliner in Ultra Black.

The Winner for Best Matte Black is Revlon ColorStay Liquid Eyeliner in Blackest Black by a landslide. Second place goes to Jordana's 12 Hr Made to Last Eyeshadow Pencil in 02 Stay On Black with the 12 Hr Made to Last Liquid Eyeliner Pencil in 01 Black Point a slightly less matte runner up.

The best Waterproof liner is Wet n Wild H2O Proof Liquid Eyeliner in Ultra Black. It not only survived a nice dip in cold and hot water but I rubbed it several times until all the other eyeliners were smeared to death and it didn't budge AT ALL. It might have become a tiny bit less black than when I first applied it but nothing very noticeable. I then soaked in a hot bath for 20 minutes, patted my hand dry and the color was still almost completely there. It faded in the middle of the thickest part and the thinnest edge. I had to put coconut oil on it, rub it in, wipe it off, add more coconut oil, rub it vigorously and scrub it with a tissue to get it all off! That is some AMAZING STAYING POWER. (**Don't worry about having trouble getting it off your eyes, I've worn it so many times and I don't scrub it. I apply extra virgin coconut oil and gently rub it, wipe it off, and apply more coconut oil to my eyelids and eyelashes. Whatever hasn't come off when you wash your face at night will come off with your morning face wash.**)


The Best Black Liquid/Gel/Creme Eyeliner Award goes to Wet n Wild H2O Proof Liquid Eyeliner in Ultra Black. It has amazing staying power, is waterproof, has a fair low price, great color payoff and creates a nice even application.

The Worst Liquid/Gel/Cream Eyeliner Award goes to the Lorac On Screen Duo in Fame & Fortune. It applied very sheer with hardly any color payoff, applied unevenly, stayed greasy and rubbed right off. It is also one of the most expensive!

Tuesday, December 10, 2013

Best Makeup Brush set, ELf vs Real Techniques vs Amazon brushes.

Being the collector of all things pretty that I am, I have several different makeup brush sets. Some I have permanently in my backpack for overnight trips, some are on my makeup counter and some are in a makeup belt that I wear while I create my look for the day.

Here are the brush sets I have:


This is the main makeup brush set I use every day. It started out with the E.L.F. 25-Piece Studio Brush Set (that came with the makeup artist brush belt) and grew into a brush village.


This is some miscellaneous brushes, since I have so many duplicates I throw the extras in here. This also includes my 10-piece E.L.F. Essentials set. (Ignore the eyeliners, I don't have anywhere else to put them.)


These are two Real Techniques sets, which actually reside in my makeup brush belt. It is the 'Real Techniques Core Collection Set' and the 'Real Techniques Starter Set.' These are fantastic brushes and if you watch them on Amazon you can get them for $10.50 - $15.50 for each set.


These are some brushes I picked up off Amazon, they were ridiculously cheap, like $11 for 22 brushes. I couldn't resist the white bristles with pink tips. Aren't they cute?


This is the first "real" brush set I ever purchased, it is a Tony & Tina basics set. I have no idea of the name or if they still sell this set. I bought these at Sephora in Seattle and paid about $60.

Now onto my travel sets:

This is the E.L.F. Studio 11 piece brush set. I keep this in my backpack since I have all these brushes in my makeup belt. You can buy these on the E.L.F. website for $30 or wait for a 50% off Studio sale and get them for $15.


I got these off Amazon too, they were about the same price as the pink ones (about $11) but there are only 15 brushes. I got these to throw in my backpack to supplement the E.L.F. Studio brushes.


The last set is one I picked up during a 50% off sitewide E.L.F. sale, the crystal travel brush set. These things are tiny! I paid $5 for them and I keep them in my purse for touch ups.


VERDICT:
If you are only going to get one set I'd recommend the 11-piece E.L.F. Studio set ($15-$30) or the two Real Techniques sets ($21-$31). They are both pretty complete and have a wide range of tools for basic makeup needs. You could do pretty much everything with either of these. If you want to step it up get the 25-Piece E.L.F. Studio set ($75 or $37.50 during a 50% off Studio sale). If you are looking for supplemental sets the two sets from Amazon (the purple and pink-tipped brushes) are great, but in my opinion neither of these has all the brushes you need.


Next Up,

What are all these makeup brushes for?

Now that you have a good brush set you might be wondering what to use each one for. I'll show what I use each of mine for, which usually includes something nonconventional and several brushes have many uses.

Foundation brushes

The first brush is my preferred brush, the E.L.F Studio Powder Brush. I pour a little foundation on my hand, dip the brush lightly into it and either stipple it on or buff it on in a small circular motion. Be sure and only do one area at a time or your foundation might dry before you work it in and look cakey. The buffing technique with this ELF brush really gives me a nice, even coverage and uses less product then stippling and it takes much less time so buffing is my preferred method. 

The next one over is the E.L.F. Studio stipple brush. These are used to stipple the foundation on (patting/pushing the product into your skin repeatedly until the foundation is blended.) This particular brush is not dense enough for me and the white bristles are too long so it takes a LOT of time and work to get your foundation on. Stippling your foundation on can help minimize the appearance of pores and create a flawless, airbrushed look.

The 3rd brush from the right is a MAC brush I believe, I bought it to buff in cream foundation from a compact. It works well. The far right brush is also a buffing brush.

The middle brushes (and the 2nd from the right) are used for painting foundation on your face. Use a downward motion to go with the direction of the tiny hairs on your skin.


Mineral Foundation Brushes

These are all used to buff mineral foundation into your skin, using small circular motions starting at the inner part of your face and working out. Dip the brush in a small amount of product, tap it off, and gradually layer if you need more coverage. If you apply too much at once your makeup will look thick and cakey.


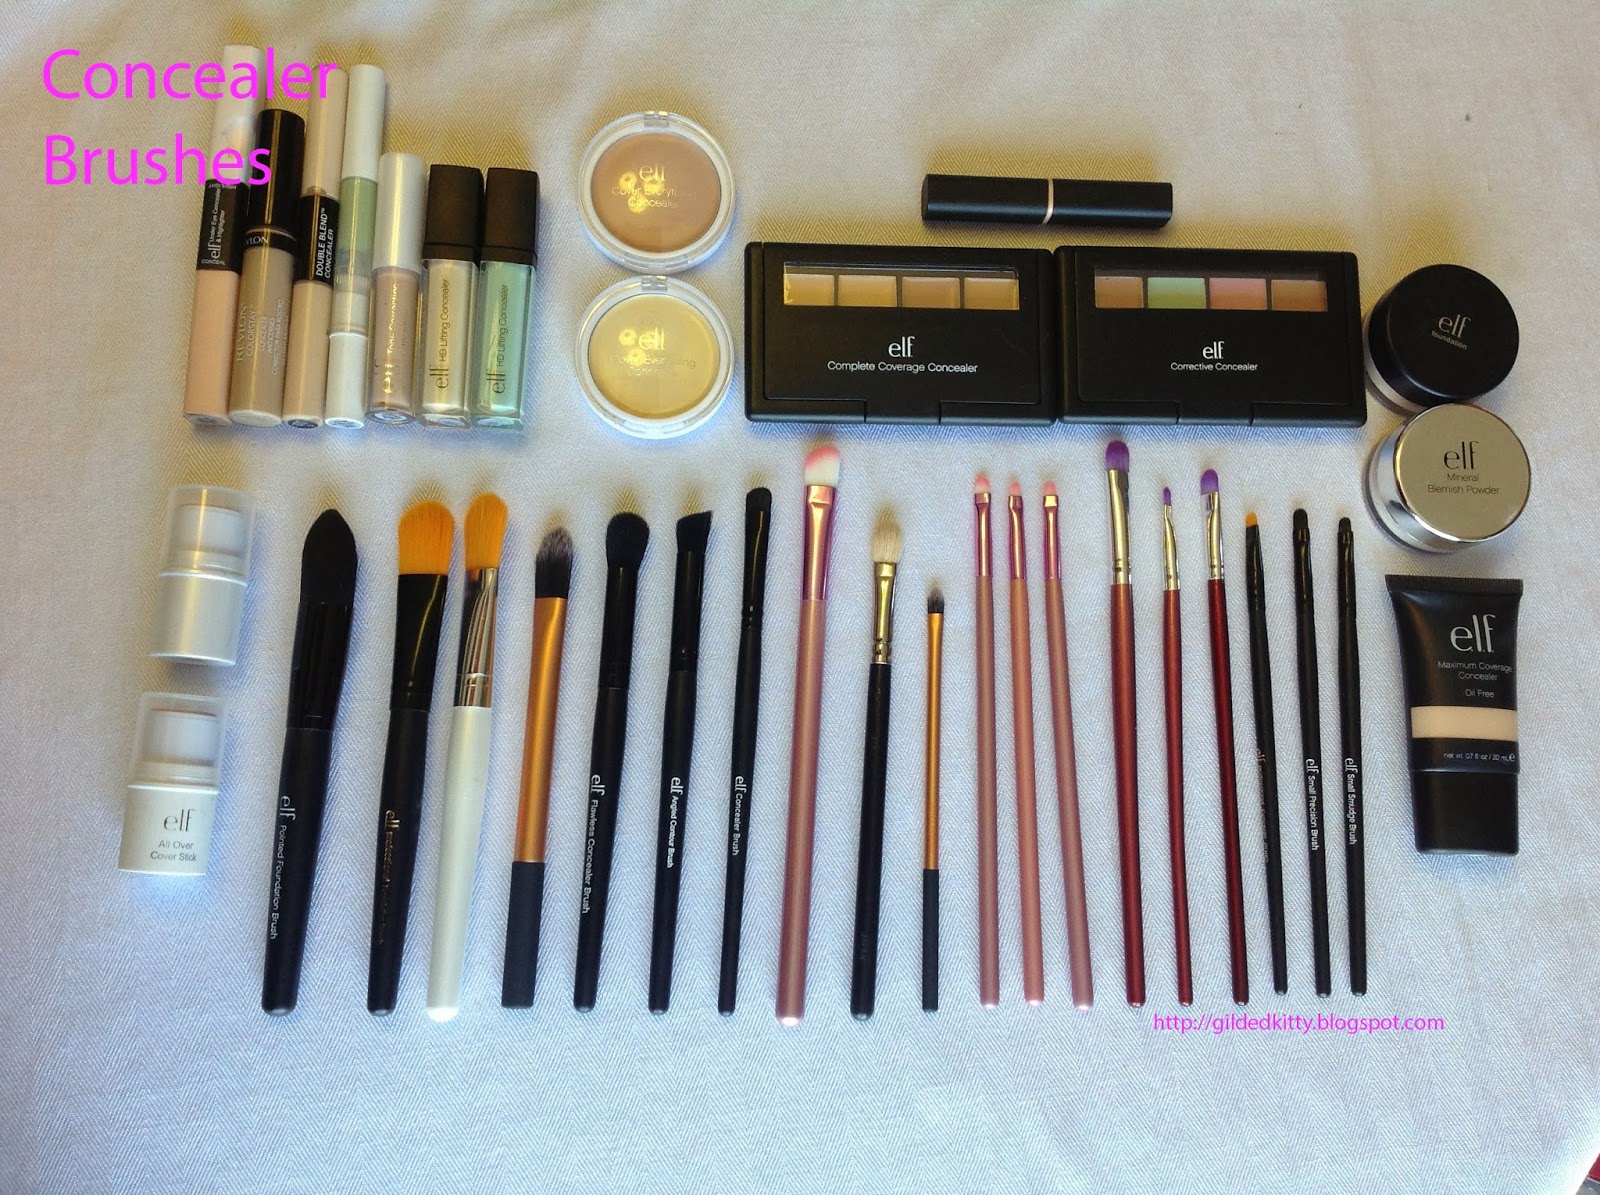
Concealer Brushes

The first 4 are foundation brushes. These can be used for concealing a larger area such as under your eyes.

The 5th and 6th brushes are the ones I prefer for under my eyes, my favorite being the E.L.F. Studio Flawless Concealer Brush. The E.L.F. Studio Angled Contour Brush is also a good one to use for under your eyes.

The rest are various sizes of concealer brushes, stiff eyeshadow brushes and detail brushes that can all be used for concealer, depending on the area to be covered and the amount of coverage you need.


Powder Brushes
I still like to use my Tony & Tina powder brush for applying a light dusting of powder. If I need a heavier coverage I use a powder puff and press the powder in, it helps make your face look more flawless but perhaps a little heavier on makeup because it becomes matte. If I have blemishes to conceal I press the powder over them because the powder brush tends to sweep the concealer away. The E.L.F. powder brush works great for powder (surprise surprise!) but I like to reserve it for my foundation and then use the same brush with the leftover foundation in it to blend out my contours and blush a little if they need to be softened.


Contouring, Blush and Bronzer Brushes

My preferred contouring brushes are the E.L.F. Studio Small Tapered Brush, the E.L.F. Studio Blush brush and the Real Techniques Contour Brush. I like my contour brushes to have a soft, tapered point so I can really get under my cheekbones. The E.L.F. Studio Angled Blush Brush and the E.L.F. Studio Mineral Foundation Brush also work well for contouring. The Real Techniques Buffing Brush is wonderful for bronzing & contouring or applying blush. 

My favorite blush brushes are The E.L.F. Studio Angled Blush Brush, Blush Brush, Small Tapered Brush, Mineral Powder Brush, or either of the Stipple brushes, and the Real Techniques Buffing brush. I prefer the stipple brushes for using cream products, contour or blush as you can get a small amount and build up the color. The E.L.F. Studio Small Stipple Brush fits perfectly into their Studio Cream blushes and picks up a tiny amount of product so you don't end up with too much color at once.

You might have noticed I haven't mentioned any of the Amazon pink or purple brushes yet. While they are a good value, the face brushes are very slippery and do not pick up product very well. You can use them in a pinch and they work just fine but they are not my preferred tools. The fan brushes can be used to contour your cheekbones or add a light flush of color to your cheeks. You can also use them to blend out your eyeshadow if you don't have something better. ;)

You might notice the two tubes of concealer on the left side of the picture. You can use a darker color than your complexion to contour, for this I just blend it with my fingers.


Eyeshadow Brushes

Depending on the look I am going for, I use one of the stiff, flat brushes (this is where the pink and purple brushes come in handy) or a softer, fluffier eyeshadow brush. As a general rule of thumb, I use the fluffier brushes for applying a more sheer layer of color and the flat stiff ones when I really want to pack on a color. The small ones, such as detail or concealer brushes, are perfect for highlighting the inner corners of eyes or applying a precise color, such as accenting bottom lash line with a bright shadow. The fluffy brushes are the best for applying highlight to the brow bone, unless you are making a thin highlight right under your brow, then the small brushes are what you need.


Eyeshadow Crease brushes

I prefer the same stiff flat brushes for doing my crease (the pink and purple Amazon brushes) and the E.L.F Essential or Studio Eyeshadow "C" brush. I like to draw a precise line and blend it out with the fluffier brushes. Those brushes work excellent for drawing a cut crease or a defined "C" or "V" crease. Since they are smaller it is easier to layer colors to deepen the crease. The four on the right are what I use to blend out the crease and blend all shadow. I also use one of the foundation brushes, the E.L.F. Essential foundation brush, to really blend my crease up and out, especially if I'm doing any sort of smoky eye. (Unfortunately I forgot to include it in the picture.) Use an upward sweeping motion, it works perfectly!  I also use the foundation brush to sweep away any fallout under my eyes, it works so much better for me than a fan brush. In a pinch any of the fan brushes work alright to blend your eyeshadow if you don't have a blending brush.


Eyeliner Brushes

Use any eyeliner brush, a small pointed paintbrush, a concealer or detail brush, a small angled brush or a flat brush to apply gel, cream or eyeshadow to line your eyes. I usually use one of the E.L.F. Essential Concealer brushes or the Small Precision brush. The small angled brushes or the flat liner brushes can make cat eyes quick and easy, you just angle the edge so it follows the curve of your eye and sweep upwards toward your temple. The flat square-looking eyeliner brushes are called push eyeliner brushes, they are meant to be used to push product (cream, gel or powdered shadow) into your lash line to create darker-looking lashes without a heavy eyeliner look. The four on the right are for smudging your eyeliner or applying a powder over your eyeliner, I usually apply a matte black shadow or a color that corresponds to the eyeliner used to smudge and smoke out the line. Alternatively you can smudge some brown matte shadow over black liner to soften the harsh look of the black.


Eyebrow Brushes
Without a doubt the best eyebrow brush would be a small angled brush. You can try others but they will probably not work as well. The pink brush with a comb/brush is to comb your eyebrows up or comb through your lashes to separate mascara clumps. The spoolie is also used for the same things. Tweezers are for plucking, in case you are completely new to this grooming thing.


Lip Brushes
All of these brushes work well for applying lip product. The key is you want some sort of tapered or rounded bristles, as a square brush would make it hard to draw curved lines on your lip. I usually just use one of the retractable brushes because I don't want to have to wash all the greasy lipstick out of another brush and risk introducing oil into something that I don't want it in. Plus they are so handy, the E.L.F. Studio Retractable Lip Brush or the Lancome Retractable Lip Brush are handy to throw in a purse. As a side note, the E.L.F Studio HD blush doubles as a very pigmented lipstick!

Miscellaneous Tools

These are a few of the other tools I keep in my makeup belt. 
  1. The first one is an eyelash curler, use this before putting on mascara or to curl false lashes if you'd like (after they are adhered!)
  2. The next one is actually a nail tool, it is for pushing back cuticles but I use it to scoop or scrape off small amounts of product. For example I'll scoop out a little eyeshadow pigment to mix with a medium to make eyeliner, or I'll scrap off some pan concealer to mix two colors. The flat side works well for shaving off some pressed eyeshadow, as it has a tapered edge.
  3. This is simply a spreader, like for putting butter or jam on bread. I use it to scoop out product, such as coconut oil or lotion to keep the container as sterile as possible. It comes in handy when I'm filling a container, such as adding some product to a smaller jar for a travel size or getting the last of something out of the bottom of a jar. I just wash it with soap and water when I'm done.
  4. This is the E.L.F. Studio mascara and shadow shield. I believe this is for putting under your eyelashes to prevent mascara from getting on your skin, or to hold under your eyes while applying shadow to catch fallout. You could also use it as a guide for winged eyeliner or a guide to creating a winged crease with your eyeshadow. I've never actually gotten around to using this as I just sweep away fallout with a flat foundation brush or if it's really bad I swipe a cotton swab dipped in coconut oil under my eyes, blot the oil off with a tissue, and apply new concealer under my eyes and set it with powder. E.L.F. also puts out a really useful makeup remover pen that works very well and it's only $3.
  5. This is my favorite gadget ever, it's a false eyelash applicator. You hold the lashes in a curved shape, apply a thin line of glue and let it sit until it is tacky, about 30-60 seconds. Hold the lashes straight up so the tips are pointing to your eyebrows and gently place them on your lash line, this is so they don't get stuck on your real eyelashes. slide them in place if they are too far to one side, using one of the points to grab the lashes near the edge. Pick up the ends and place them right against your lash line if they didn't land there. Now use the tool like a clamp and squeeze the false lashes into your own, this helps them adhere and puts them right against the lash line. This thing is a Can't Live Without for me. Alternatively you can use a tweezer, which is what I did before I found this tool.
  6. The last one is a tweezer, for plucking, picking up, placing, etc. There is always a use for tweezers in a beauty bag.

Read my post on which brush set is the best for your money.

Makeup of the Day & Black Plum Rhapsody Wig

Today I wanted to try using some temporary eyeliner tattoos I bought awhile ago. I have only tried them one other time and the results were mixed - they are fun but very hard to apply evenly and they always seem to break apart on my eye, ruining the intricate design.

I first washed my face, making sure to remove all the coconut oil from around my eyes. I'll post on that later... :)
I swiped my eyelids with rubbing alcohol, making sure to keep my eyes closed until it dried. Slightly moistening my eyelids with water, I placed the temp tattoos and pressed them down lightly with a wet washcloth, positioning and pressing down the inner corner with a wet cotton swab. The inner corner is easy to mess up and this helps line it right up with your eyelid. Even after this they were still crooked, with one wing sweeping higher than the other. It is extremely hard to get these perfect since you can't see them under the paper when you place them.

I filled in the gaps and right against my eyelids with black liquid eyeliner, drawing one side up higher to make them more uniform. I then did a smoky eye to hide the unevenness even more and used a very light hand on the rest of my face with a nude lip. I added big dramatic lashes and topped the look off with a Rhapsody wig in Black Plum from Gothic Lolita Wigs.


Here is a look at the tattoos up close. As you can see they look better from far away. As Raymond Chandler once said, “From 30 feet away she looked like a lot of class. From 10 feet away she looked like something made up to be seen from 30 feet away.” 


The weird thing is my boyfriend kept saying how pretty I looked, and how he loved my makeup. Yes, I was baffled because he was clearly much less than 10 feet away.

I would probably avoid these eyeliner tattoos because they really don't look all that good from up close. They have a plastic look to them that extends around the edges, and makeup doesn't adhere to that part well. They are extremely hard to position properly, and often for no particular reason, like if you blink or move your eyes, you will get a break or tear in the tattoo. Also the designs with color don't show up well. This tattoo has tiny colored stars on it and they look muddy since there is no way to put white makeup under them. On the other hand, they are very cheap. Like $5 for 40 pairs of them. So that is a good reason to get them, something fun to play around with for little $$$.